
Deviation Actions


![Sketchdump June 2016 [Faces]](https://images-wixmp-ed30a86b8c4ca887773594c2.wixmp.com/f/060c5b2a-d29c-4413-a193-8ea0726072c5/da7t725-3774e102-5d7b-447a-8aad-197b5c9aa06f.jpg/v1/crop/w_184,h_184,x_0,y_149,scl_0.15333333333333,q_70,strp/sketchdump_june_2016__faces__by_damaimikaz_da7t725-92s-2x.jpg?token=eyJ0eXAiOiJKV1QiLCJhbGciOiJIUzI1NiJ9.eyJzdWIiOiJ1cm46YXBwOjdlMGQxODg5ODIyNjQzNzNhNWYwZDQxNWVhMGQyNmUwIiwiaXNzIjoidXJuOmFwcDo3ZTBkMTg4OTgyMjY0MzczYTVmMGQ0MTVlYTBkMjZlMCIsIm9iaiI6W1t7ImhlaWdodCI6Ijw9NTA3NyIsInBhdGgiOiJcL2ZcLzA2MGM1YjJhLWQyOWMtNDQxMy1hMTkzLThlYTA3MjYwNzJjNVwvZGE3dDcyNS0zNzc0ZTEwMi01ZDdiLTQ0N2EtOGFhZC0xOTdiNWM5YWEwNmYuanBnIiwid2lkdGgiOiI8PTEyMDAifV1dLCJhdWQiOlsidXJuOnNlcnZpY2U6aW1hZ2Uub3BlcmF0aW9ucyJdfQ.ti6z0gP6Y1S8gc0xhXfxzEt-HZXC7UUXtwUVpC7KreE)
![Sketchdump June 2016 [Faces]](https://images-wixmp-ed30a86b8c4ca887773594c2.wixmp.com/f/060c5b2a-d29c-4413-a193-8ea0726072c5/da7t725-3774e102-5d7b-447a-8aad-197b5c9aa06f.jpg/v1/crop/w_92,h_92,x_0,y_74,scl_0.076666666666667,q_70,strp/sketchdump_june_2016__faces__by_damaimikaz_da7t725-92s.jpg?token=eyJ0eXAiOiJKV1QiLCJhbGciOiJIUzI1NiJ9.eyJzdWIiOiJ1cm46YXBwOjdlMGQxODg5ODIyNjQzNzNhNWYwZDQxNWVhMGQyNmUwIiwiaXNzIjoidXJuOmFwcDo3ZTBkMTg4OTgyMjY0MzczYTVmMGQ0MTVlYTBkMjZlMCIsIm9iaiI6W1t7ImhlaWdodCI6Ijw9NTA3NyIsInBhdGgiOiJcL2ZcLzA2MGM1YjJhLWQyOWMtNDQxMy1hMTkzLThlYTA3MjYwNzJjNVwvZGE3dDcyNS0zNzc0ZTEwMi01ZDdiLTQ0N2EtOGFhZC0xOTdiNWM5YWEwNmYuanBnIiwid2lkdGgiOiI8PTEyMDAifV1dLCJhdWQiOlsidXJuOnNlcnZpY2U6aW1hZ2Uub3BlcmF0aW9ucyJdfQ.ti6z0gP6Y1S8gc0xhXfxzEt-HZXC7UUXtwUVpC7KreE)


Description
Making soldier figurine tutorial
There was another character in this scene if you have recalled from the first tutorial.
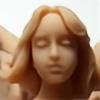
The pictures shown the sculpting process of a soldier that the angle holds when takes off. As you can see, they both are off the ground, the angel raises right hand praying and grabs his shoulder with a sort of power. The soldier has lost a leg and possibly is unconscious.
Hope you look at the step by step pictures carefully and figure out how it has done. I took as many photos as I can during sculpting. It's bothersome if you do the same like me. But I couldn't find a better way showing the sculpting process for now.
*Basically, I started with his boot. Layered up the leathers and folds, made the shoestring, holes and stitches etc and baked first. You may make more or less detail according to the proportion of your figurine.
*Held the boot and upper body making his pants. The character was at the battle, so the pants shouldn't be neat, you may look for good reference of war pictures or movie scenes. His left leg has broken, I did look for some reference for the bombed and burning body for the details. Before I baked the lower half body, I made a stand with wires and stick it into the back of pants then pulled it off.
*Held the lower body and head making the upper body. The methods were about the same, the pins attachment, working from big portion to the folds details etc. There was a big pin that goes into back of his waist, the pin was actually held the whole weight of angel. So I added some paperclips ho make it stronger.
You may have seen the pictures with cut off of his left arm and a big piece cut off left hand. I made a mistake of the proportion of his left arm after baked, so I tried to fix it in the right proportion without cut the whole thing off. It is important that you know how to fix Super Sculpey after baked, how to work on hard and soft clay together.
The heads of both characters and the base will be in next tutorial. It shall be the final. To be continued...
Alex Liao
Please also refer to the following related tutorials:
Figurine WIP/ tutorial part 1 armatures and legs
Figurine WIP/ tutorial part 2 dress and folds
Figurine WIP/ tutorial part 3 wings
Figurine WIP/ tutorial part 4 wings
Figurine WIP\ tutorial part 5 the soldier + angel
Figurine WIP\ tutorial part 6 heads + base final
Final sculpture scene:
Bring the boy back homeby sculptor101
--------------------------------------------------------------------------------------
《歡迎搜尋加入》Welcome to add me:
網站(Website):www.sculpture.com.tw/
Blog:art.sculpture.com.tw/
Instagram:instagram.sculpture.com.tw/
Pinterest:pinterest.sculpture.com.tw/
Youtube:Youtube.sculpture.com.tw/
#Instagram #pinterest #Blog #deviantart #sculpture #garagekit #sculptor #videoturorial #sculpturetutorials #arts #design #molding #modeling #YouTube #FaceBook #雕塑 #公仔 #精工 #影片教學 #藝術 #設計 #陶藝 #模型 #模型師 #原模師 #雕塑教學 #公仔模型 #動漫 #翻模 #原型師